Remove Switch Label on Windows with .NET MAUI

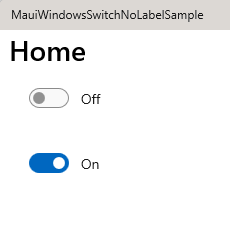
One thing that comes up from time to time is how the Switch control in .NET MAUI is different on Windows than it is from other platforms. Namely, on Windows the Switch has a label to the side which will tell you the state: on or off. While I understand that it might seem a bit funny that we don’t have that on other platforms, keep in mind that .NET MAUI translates everything into how it’s supposed to look and feel on the platform it’s running on. And in this case, on Windows, that label is there!
However, if you do want to get rid of that text next to the Switch, keep reading. If you want to dive straight into the code, have a look at this sample repository.
Custom Handlers and Mappers to the rescue! #
Luckily, .NET MAUI has been designed with this in mind: giving you control over how something looks and feels. The .NET MAUI SDK surfaces a lot of the APIs that are common across platforms and those are super easy to use, but you don’t lose any of the power to reach into the platform functionality and make your own adjustments. That is exactly what you can do with custom handlers and mappers. If you want to read more about this architecture, read up on Microsoft Learn.
And that is also what we will use to change this behavior!
We will touch the surface of the mechanics of customizing a control, but if you want to read more about how to leverage handlers and mappers to customize existing controls, there is also a good documentation page available for it.
Removing the text label #
When you go into the platform-specific functionality, it comes in handy to know a little about it or you will soon find out anyway. In the case of a Switch, on Windows this is actually a ToggleSwitch. And that ToggleSwitch has properties for OffContent and OnContent. That means you can even set different content for the on or off state.
If you want to remove the text altogether, you can use the code below.
#if WINDOWS
  Microsoft.Maui.Handlers.SwitchHandler.Mapper.AppendToMapping("NoLabel", (handler, View) =>
  {
      handler.PlatformView.OnContent = null;
      handler.PlatformView.OffContent = null;

      // Add this to remove the padding around the switch as well
      // handler.PlatformView.MinWidth = 0;
  });
#endif
Notice how we use a compiler directive (#if WINDOWS) to make this specific to Windows. We’re going to use Windows specific APIs which won’t compile on other platforms, so we need to have this. Then, we do AppendToMapping, which means we add our customization after the mappings were applied that are the default .NET MAUI mappings. This way we will know for sure that we go last and we override any other changes that might have to do with this.
A mapping will need a key, but it can be anything, in this case we just set it to NoLabel. Then we provide the Action that will actually be used to apply our customization. Inside of that we set the properties I mentioned before: OnContent and OffContent. If you want to customize it another way, you totally can, give the text a different color, or provide a different text, anything you want.
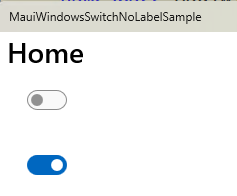
When we run this code, we see that the switches won’t have any labels anymore, yay!
Customize only certain Switches #
But maybe, you have a requirement where you want to apply this to one Switch, but not the other. In that case you can create an inheritance. In your code add a new class, I will call it MyCustomSwitch, you can see it below.
public class MyCustomSwitch : Switch
{
}
This will keep all the default behaviors of the built-in Switch, but it will give us the ability to differentiate. If we revist the custom mapper code now we can check for this type and only apply the customization to that.
#if WINDOWS
  Microsoft.Maui.Handlers.SwitchHandler.Mapper.AppendToMapping("NoLabel", (handler, View) =>
  {
      // Remove this if statement if you want to apply this to all switches
      if (view is MyCustomSwitch)
      {
        handler.PlatformView.OnContent = null;
        handler.PlatformView.OffContent = null;

        // Add this to remove the padding around the switch as well
        // handler.PlatformView.MinWidth = 0;
      }
  });
#endif
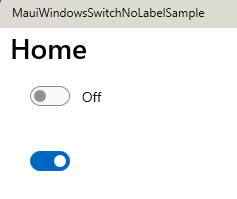
Doing it like this will still show the label for the default Switch control, but remove the label for our custom MyCustomSwitch.
Wrapping up #
Out of the box .NET MAUI already provides lots of options to customize controls, but by leveraging custom handlers and mappers you can tap directly into the power of a specific platform and unlock that according to your needs.
In this example it’s about the Switch control, just because that is a control that has a bigger deviation between the platforms, but of course you can use this method on any control in the .NET MAUI box.
All the code used for this example can be found on this GitHub repository.