Continuous integration/continuous delivery for your Xamarin app with VSTS and HockeyApp - Part 1

Continuous delivery is the new agile
This is a quote a saw on Twitter by Sander Hoogendoorn and it seems that he is kind of right. Continuous Integration (CI) and Continuous Delivery (DI) are rapidly becoming more and more popular and together with that there are a lot of tools to support you with that, including VSTS. And rightly; it’s freaking awesome stuff!
But how does it work for your Xamarin app? What tools are available and how do I get my own pipeline set up? And what will it cost me as a simple, single developer? I will answer all of these questions and explain you how to do it! And yes, you can do it completely for free!
If you want to read more extensively about this subject, you can now order my book. It describes everything that is in here, and much more!
In this post… And what is not. #
There are several ways to set you up. As a Microsoft developer I’m going to assume that you already (know how to) use Visual Studio Team Services (VSTS formerly known as Visual Studio Online). Since Microsoft has acquired HockeyApp and Xamarin, they now have all the tools to supply you with a fully featured CI/DI pipeline. Ultimately it would look like this.

In the bottom left corner is you, typing your awesome code like a boss. And when you’re done, you check it in, this will trigger a automatic build to check if your code runs not just on your machine and integrates with the code of other developers which work on the same project. If that succeeds you can have some unit tests run over them and send your app over to Test Cloud to have it tested on physical devices. If so far everything still everything is ok you can either send it directly to the store or first distribute it to HockeyApp so it will go to (beta) testers.
In this post I will describe how to setup VSTS so your build will trigger automatically and send it over to HockeyApp. As a bonus I will describe how to setup your spare Mac as a build agent, which you will need if you want to build and deploy your iOS apps.
In other posts later on I will describe how to do it using Bitrise.io which does not require you to provide your own Mac. And maybe even AppVeyor. I will probably mention these to tell you about some differences among them.
So what is not in this post is triggering any kind of tests. Simply because it is too large a subject to just mention it here sideways, also something I will focus on later.
First; checking in to VSTS #
It all starts with your check in. To make this all work it is easiest to use Git as a source control provider. This is all nicely integrated in VSTS nowadays so that shouldn’t be a problem, but it is something to consider when you create a new project. You cannot convert from one to another later on, so get it right from the start or be prepared to lose all your history.
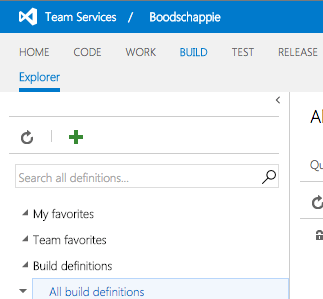
Let’s go into our visualstudio.com account, go into the project you want to unleash the magic on (in my case Boodschappie, which is an app I’m developing right now for groceries management) and hit the green plus button on the left side.
Like you would expect from a Microsoft product you’ll get a screen where you can choose from several templates which already do most of the work for you. If you’d want to you can start with an empty one. While you go through the list you notice that there is a Xamarin.Android and Xamarin.iOS, no Xamarin.UWP and no Xamarin.Forms.
This is perfectly plausible. Remember; Xamarin.Forms is an addition to regular Xamarin.iOS, Xamarin.Android and Xamarin.UWP apps. So when it comes down to building and distributing your apps they are still separate apps. Let’s focus on the iOS app first, so select the Xamarin.iOS template and click Next.
Already we have arrived at the last step of creating are build config! That wasn’t so hard! Here you can configure where you want your source to come from. You probably want to stick with the first option but as you can see you can also use a GitHub or even other repository sources. Also you can specify which repository and branch is to be used.
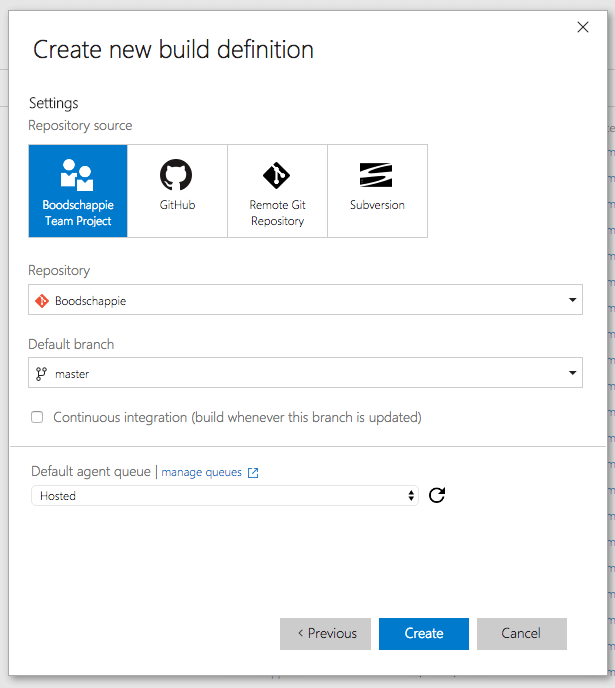
There is also a checkbox for ‘Continuous integration’ this means the build definition will fire every time you do a checkin of your code.
Last but not least you can configure your Default agent queue. Agent.. whaaaaat..? I’ll get into build agents in VSTS in a little bit.
For now just click Create and read about build agents below.
Build agents #
A build agent in the term for a server which is listening to your TFS server until its services are requested. The services of a build agent are to build you code! For on-premise TFS service in a small business it is/was usually enough to install an agent directly on your TFS server and build it there. For larger corporations it could be necessary to have multiple build agents so that if one is busy, another can take over.
Now with Microsoft supporting a lot of different platforms there is a new use-case for having different build agents. A build agent on Windows does not have the capability to build iOS projects. Simply because Apple is keeping the lid on the iOS SKDs and have them only running on Mac hardware with XCode.
So you would need a separate build agent for building your iOS projects. I will explain how to do this further on, it’s pretty easy to do nowadays, but you do have to have a spare Mac!
If you don’t then another alternative could be MacInCloud. Basically what they do is rent you a Mac which you can use for your build needs. Prices start at one dollar per hour by pay-as-you-go to about 30 dollars per month to have a build agent which suits your need. I do not have any hands on experience so I cannot tell you about the speeds, but if it is any comparison, my on-premise Mac build agent working with VSTS is surprisingly quick!
If you do have any experience with MacInCloud please share!
Configuring the build definition #
Ok, so we have created a build definition. If you go into it you’ll see that there are already some steps in there, and judging by those red markings it isn’t very happy.
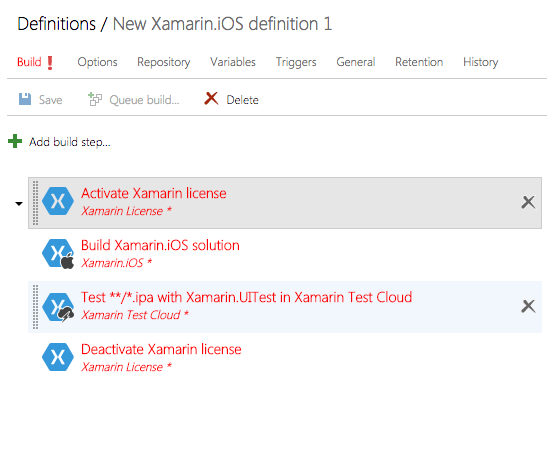
The first and last steps are easy and not completely relevant any more. Since Xamarin licenses are free now I think these will disappear over time. Actually, try to leave them out if you’re feeling adventurous en let me know what happens ;)
\[Edit: 23rd August 2016\] - I actually did try to leave out the (De)activate steps for your Xamarin license and it’s all fine! So you can leave them out, no problem!
Any way, just input your Xamarin account in there for now. You shouldn’t feel comfortable with just entering your password in there plain text, so let’s find out how to go about that.
(Secure) build variables #
Go to the Variables tab at the top of the screen. There are already some values in there. Click the Add variable button at the bottom of the list to add a new one. Name it appropriately, in this case something like ‘XamarinPassword’ should do and enter your password in the Value field. Now click the tiny lock after the Value field. Your password Value field should transform into a password box. Now you can use this variable in your build step and you don’t have to share your password with everyone. Awesome!
This can be used for all kinds of values you want to be variable! Secure or not. Also, you can use them in any build step that you create. So use them to refer to certain files or paths, passwords, version numbers, etc. If you get the hang of this you’ll see the use for it.
Also it is good to know that there are a lot of variables already built-in which can give you all kinds of information about the build being err… built. Check out that list and some more information here.
Finishing the build definition #
So lets go back to the Build tab and go into the Activate and Deactivate step. Now instead of your password enter $(XamarinPassword). Awesome!
Alright, now for the hard stuff. The actual build step.
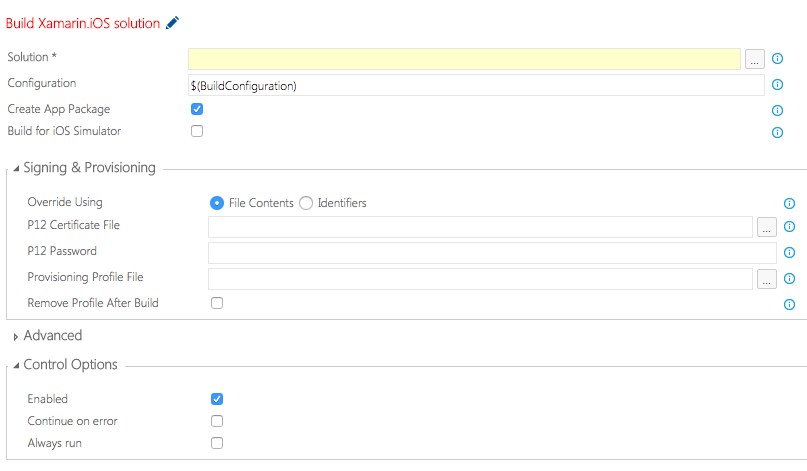
Actually the only thing we really have to do here is specify the solution that has to be built. Click the browse button at the end of the input field to choose one from your repository.
There are some more options you can configure which shouldn’t be a stranger to you if you have looked at creating an app package before. I am going to assume you have. Most important here is probably the Signing & Provisioning part. You can provide a p12 certificate file and .mobileprovision which are used to sign and provision this ipa. This is iOS specific. For your Android project you will have to do something with a keystore here. You can also use your app identifiers, which will require you to have the neccesary certifications and provisioning profiles on your Mac build agent. Also, if you have these settings in you project file already, there is no need to override them here. Again, then you will have to have the required configuration on the Mac you’re building this on.
The final step is to run the test project through Test Cloud. As said before, I am going to leave this out for now but it is very important to have your tests in place! Firstly because Test Cloud is just awesome. Secondly so you can keep track of the quality of your app. If you want to do this, just configure it the way you know how. If you’ll do this later, easiest is to uncheck the Enabled checkbox and enable it when you’re ready.
On the VSTS end everything is ready to go! Now we just need that build agent.
Installing the Mac build agent #
Now that we have our build definition ready, we are going to need our build agent ready to do work.
I was able to try this out with a simple Mac mini which was lying around, the specs are from a few years back, it’s nothing fancy, it doesn’t even have a SSD yet. Still, performance is pretty good! It doesn’t have to do very hard work so some basic hardware is already enough.
If you don’t want to use it for anything else (which I would recommend), just wipe it and clean install the latest Mac OS version. Also install XCode and Xamarin. I didn’t have any other use for my Mac other than building stuff so I also setup TeamViewer with unattended access so I now just have a Mac somewhere in a closet with a power and network cable and that’s it.
Last thing you have to do to get things running is installing the build agent. This can easily be done from VSTS on your Mac. Go into your dashboard and click the configuration (gear) icon in the upper-right corner. This is something that can work a bit confusing. If you click it from a project you’re in you’ll get a different configuration then when you click it from you overall VSTS dashboard. So if you don’t see the Agent Pools tab, check the upper-left of the screen and click your username. The path should say ‘Control Panel > Username’ not ‘Control Panel > Username > Project’. See the screenshot underneath.
Ok, so go into the Agent Pools tab.
Agent pools #
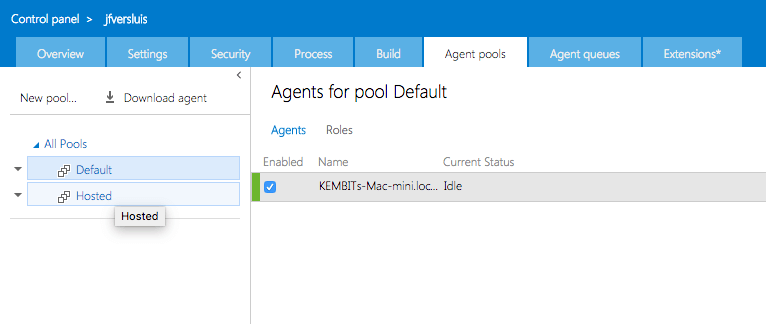
If you haven’t setup a build agent before you’re screen is probably blank here. The Hosted pool is pretty awesome. This pool is provided by Microsoft with basic (shared) build agents in Azure which provide in your basic building needs. Most of your .Net projects can build on them out of the box.
If you have specific needs, you can setup your own pool, or pools. You can arrange them whatever you like. Group them by capabilities, geographical location, color, whatever you want! But since you will probably have just one just put it in the default pool.
For setting up the rest of your agent check out this link by Rene van Osnabrugge which knows a awful lot about ALM, so let him explain it best to you!
Queueing your first build in VSTS #
After you have this up and running go back to your build definition and try to queue your first build! You’ll feel like a downright hacker doing so because all of the letters scrolling over your screen. It will probably take you some times before you get it right. Examine the log closely to see what goes wrong and what you could do to fix it.
If you encounter any problems that you can’t solve by yourself, let me know! I’ll be glad to help.
I think I have to conclude for now here and create another post for the second half! So let me know how this works out for you, then I’ll be back for a second part telling you how to get this build to HockeyApp!