Sending Push Notifications from a Azure Function

For a recent project I needed to implement a prototype for sending push notifications. Of course the backend will be the source of these push messages, but we wanted to show something to the customer today. For this, I have put together a small but simple Azure Function that allows me to send a custom message. In this post I will show you the process and code.
In this article I will not go into how to implement push notifications on your apps, this will just be about sending messages through the Azure Notification Hub. If you want to setup your apps, have a look at my earlier series about push notifications, starting with this post.
If you’re not interested in the whole post but just the code, you can find it here: https://github.com/jfversluis/PushFunction.
Setting up #
Before we can start sending push notifications there is a few things we need to setup. There are a lot of ways to establish this, but I will be using:
- Azure Notification Hub
- Google Firebase
- Apple Push Notifications Service
- Azure Functions (doh)
- Translation Text API (optional)
So, if you do not have an Azure account already, I recommend you get one!
The focus of this post will be Azure Functions and sending push notifications, I will very briefly go through the plumbing on the Azure side to not leave you clueless, but I try not to go into detail too much.
Azure Notification Hub #
The Azure Notification Hub is a great solution for unifying the different vendor solutions to sending push notifications. When you want to implement push for iOS and Android, typically you would have to talk to Apple and Google servers separately as well as let all the device registrations go through them. That is something that the Notification Hub wants to overcome. Microsoft provides you with a single point of entry for both vendors. There is even support for other platforms beyond Apple and Google!
This way, you can unify registration of the devices of your users, letting Notification Hub take care of the rest. Also, sending a notification can simply be done by delivering it to Notification Hub and it will distribute it to the right vendor service for you.
To set it up, simply go to the Azure Portal create a new resource and choose the Mobile App. This will contain a set of services including the Notification Hub. You see where to find it in the screen underneath.
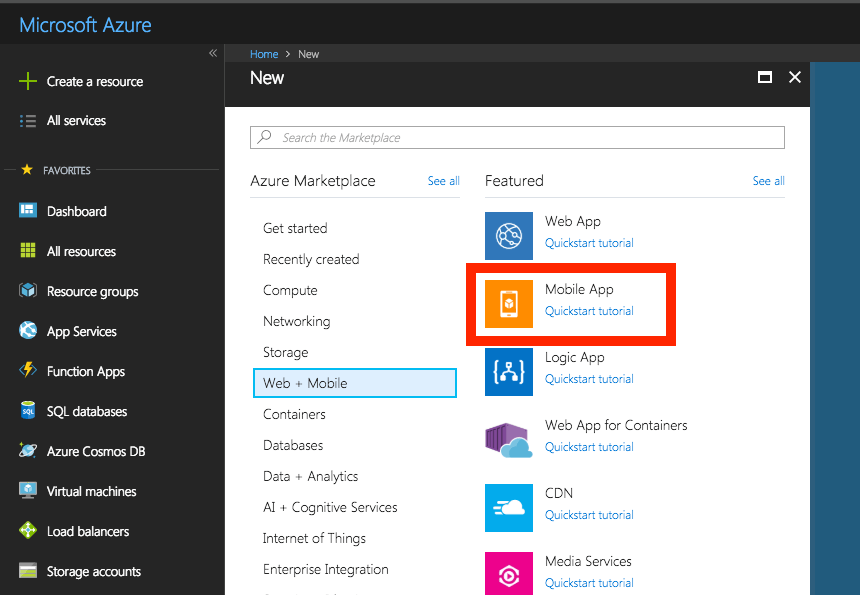
The reason to choose a Mobile App is because it will also create a public URL for you that can be used to register devices and send your push notification requests. Configure the Mobile App and wait until Azure has done its magic.
When the Mobile App is done, go into it and find the Push blade. There we will connect the actual Notification Hub I will be talking about mostly here. Click the Connect button and add a new Notification Hub. Of course, if you already got one, you can connect it here.
Configuring it is easy, just think of a name for the hub (remember this one!) and name for a namespace. You will also have to specify the pricing tier. There is a free tier to start from, later you can scale it up as needed. again save everything and wait for it to be configured. Because you have connected the Notification Hub from the Mobile App it will be connected automatically.
After the Notification Hub has been created, head over to the Access Policies blade and make note of the value in the DefaultFullSharedAccessSignature field. You will need it, together with the hub name to configure the Azure Function.
Google Firebase #
While Azure Notification Hub takes care of the hard work for you, you will always need to go through Google (and Apple) servers to send a push notification. For this to work, we need to get credentials from said vendors to authenticate. In this part I will show you how to retrieve the credentials from Google.
Head over to the Firebase Console and setup a new project and add a new app to it. In the settings of the app, go to the Cloud Messaging tab and find the Legacy server key. You can see this screen underneath.
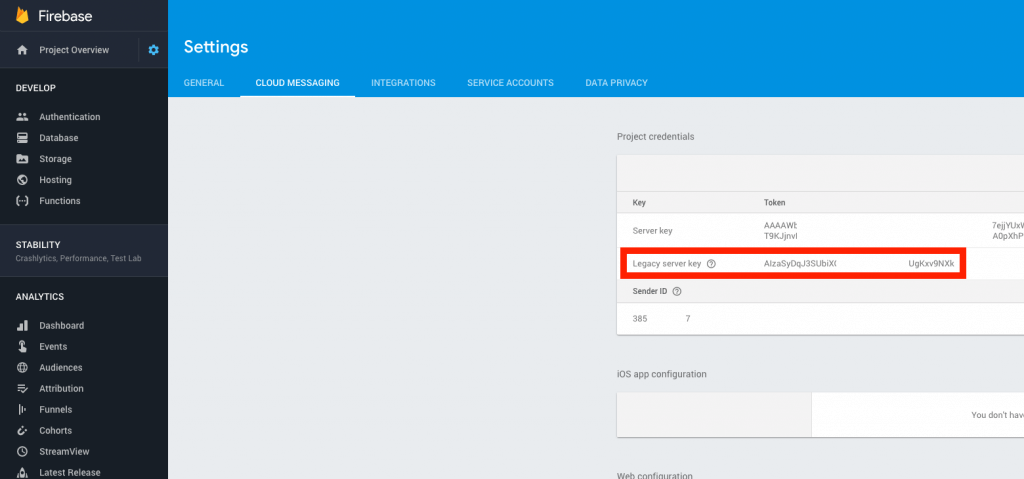
Copy this key, go into the Azure Notification Hub you’ve created, navigate to the Google section and paste in the key. That’s it!
For Apple, things are a bit more complicated.
Apple Push Notifications Service #
Similar to Google Firebase, you will need to register with Apple. This is achieved at the Apple Developer Portal. If you have implemented push notifications on iOS before (like I have here), you might remember that it is a very tedious and not fun thing to do. Luckily, things are now a little bit easier. Log into the developer portal, go to All, under Keys and create a new one. Give it a descriptive name and check the APNs checkbox. The screen for this is underneath.
Complete the process by clicking next and confirm and download the key file in the last screen. Also make note of your Team ID in the Membership page (https://developer.apple.com/account/#/membership/) and the bundle ID of the app you want to send push notifications to.

Head back over to the Notification Hub configuration page and enter the data we just retrieved from the portal as follows:
- Set the Authentication Mode to Token
- In the Key ID field enter the key that is in the filename that you downloaded. For instance the file you downloaded was named AuthKey_PLGV2SAAEJB.p8, your key is PLGV2SAAEJB.
- In the Bundle ID field enter the bundle ID of your app. i.e.: com.mycompany.myapp.
- The Team ID field is where you put your Apple account Team ID you noted from the portal.
- And finally the Token field is where you put the contents of the downloaded p8 file. Open it with your favourite text editor and copy everything between -—-BEGIN PRIVATE KEY—– and -—-END PRIVATE KEY—– but leave in the line breaks(!). Because you have to paste it into a single line textbox I was taking them out and it didn’t accept it. Just leave the line breaks in and save the settings.
At the bottom of the page there is a switch for production or sandbox. This choice is easy; while debugging use the sandbox, else use production! You can’t have both at the same time, so if you will keep needing a test environment after going to production you will have to spin up a second Notification Hub.
The last ingredient that remains is the actual Azure Function, read all about this below.
Creating the Azure Function #
Setting up a Azure Function can either be done through the Azure Portal directly or from Visual Studio and deploy it from there. Since I thought of this in the spur of the moment I just opened up the Azure portal and started coding there. Later, I downloaded the source and put it into a repo so you can benefit from it as well!
When you start coding in the portal, the main file that you have is the run.csx file. That is where all the logic resides. At the very least you need to have a static method Run and put all the code you want to execute there. The signature for this method looks like this: public static async Task<HttpResponseMessage> Run(HttpRequestMessage req, TraceWriter log). You will have a incoming HttpRequestMessage which contains all the information you need about the incoming request. You can extract from it whether it is a GET or POST request, the query parameters, the body, etc.
There is also a TraceWriter which allows you to write to a simple logging mechanism which you can then diagnose in the Azure web portal.
Sending a Message #
Sending the actual push message is not so hard when everything is setup right. Underneath the code is extracted where the actual push notification is sent.
There are two #error flags in this code where you need to supply your own values, the ones I indicated you had to note before.
I use the Microsoft.Azure.NotificationHubs library to connect to the Azure Notification Hub and send the message. The notification hubs library is in the Azure Functions hosting environment by default, but not referenced. To do this add this line to the top of your file: #r “Microsoft.Azure.NotificationHubs”. Including the quotes. More info can be found in the documentation: https://docs.microsoft.com/en-us/azure/azure-functions/functions-reference-csharp#referencing-external-assemblies.
You can also use plain old Nuget packages in your Azure functions, but when you are using the Azure web portal to create your function you cannot simply right-click and install your Nuget packages. You can either doing so by adding and editing a project.json file.
All you have to do is supply the connection string and hub name that you can extract from the Azure portal. Then, simply compose JSON objects for Android and iOS and add them as input parameters to the send methods. The return req.CreateResponse(HttpStatusCode.OK); line lets the Azure Function return a HTTP 200 (OK) message, letting the client know that everything went OK 👌.
Translation #
In the app I am building, localisation is one of the requirements. To make the prototype a bit more lifelike I wanted the localisation to be reflected in these push messages. For this, I have used the Translator Text API, now part of the Azure Cognitive Services.
After signing up for a account and getting the right credentials, calling upon it is not very hard as you see in the code underneath.
Simply call the API url with our given parameters and we get back a XML document with the result. It automatically detects the input language for us.
Actually the XML document result is something we seem to be stuck with for now, this posed a little problem as I wanted to use the System.Xml.Linq namespace which isn’t supported in Azure Functions. Or at least not with the runtime version I am using. That can easily be overcome by using A XmlDocument object to extract our result.
Badge Value #
Lastly, I also wanted to show a badge value on iOS. This isn’t much more than a numeric value that I supply with the push notification request and then pass on to the Apple push notification message. In the code block above, you can see how I supply a value with the var iOSalert variable. This will show as a red balloon in the top-right corner of the iOS app icon. Set the value to 0, to hide the balloon.
Triggering a Push Message #
Because the Azure Function has both a trigger for the GET HTTP verb as well as the POST verb we can invoke a push message in these two ways. To read more on triggers, have a look at the documentation page here.
For a GET, simply navigate to the URL where the Azure Function is hosted, for example: https://yourhost.azurewebsites.net/api/Send?message=This%20is%20a%20test%20message!&langcode=nl&badgevalue=42. This will send “This is a test message!” translated to Dutch with a badge value of 42. The message has to be URL encoded (read here) but if you use Chrome it will do that for you automatically.
The other way to send it is trough the POST verb. In this case, you send a request to https://yourhost.azurewebsites.net/api/Send and supply a body with a JSON object. A sample JSON object is underneath.
{ “message”: “This is a test message!”, “langcode”: “nl”, “badgevalue”: “42” }
This will result in the same push notification message, but is now send with a POST request.
Wrapping up #
In this post I have shown you how to quickly setup a Azure Function to send push notifications to your app. Setting up the infrastructure around it seems to be the majority of the work. While sending actual push notifications is just a couple of lines of code.
The code for this is far from production-ready, but can be used as a boilerplate or prototype. If you are worried that anyone can invoke the function with a simple browser request, have a look at the authorization settings that are available or create a super-secret header value that you check in code.
Feel free to use is any way you like. Full source is available on Github: https://github.com/jfversluis/PushFunction
Edit: Mikhail pointed out in the comments that things can be done a little bit easier with the Notification Hub output binding, a link can be found here: https://docs.microsoft.com/en-us/azure/azure-functions/functions-bindings-notification-hubs. Thanks Mikhail!