Git Rebase: Don't be Afraid of the Force (Push)

While contributing to a big OSS project it’s quite useful to know how to do a Git rebase. And more importantly: don’t be afraid of the Git force push. In this post I will write a little about the why and the how.
master I have updated the text to now use main. So where it says master in the screenshots, you can substitute that for main.The Backstory #
Finally, your change is ready for the world to see. You have gathered the courage to open that PR and hope it will get merged soon. Unfortunately reality is that your PR might be sitting there for a while. Meanwhile, development goes on and the branch you are targeting with your PR gets updated.
While this happens, conflicts may arise. These are conflicts between your code changes in the PR and other changes that got merged into the target branch. What you could do is merge the changes from the target branch into your PR branch. That will however give a lot of merge commits and isn’t very clean. Another way is to do a rebase.
To make the example more specific. On the Xamarin.Forms repository we might ask you to do a rebase whenever there are conflicts. Another reason might be that you have just opened the PR at a time where the tests or build were in a bad state. Or your code hooks into new code that is now added in the target branch. As you can see, there are a lot of reasons for a rebase.
What is a Git Rebase exactly? #
This is where things start to get a bit scary, because it involves rewriting history due to force pushing. Let me expand on that. What will happen during a Git rebase is that the commits you want to add to the codebase are replayed on top of the target branch.
Imagine you want to add commits to the main branch. Since you opened the PR, new commits were added to the main branch. When you do a Git rebase you take that latest state of the main branch. Then commit by commit your changes are re-added on top of the latest state on main. After each commit is replayed there is a check if there are conflicts which you should then fix, but more on that later.
Have a look at the graphic below which will hopefully make it a bit more clear. On the left you see a merge, in the middle is your typically branching and on the right you can see a rebase. Imagine that the yellow dots are main and the purple ones are your branch/PR.
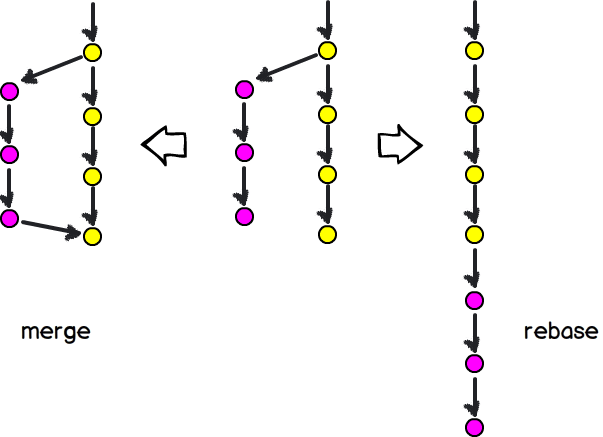
Image from: https://commons.wikimedia.org/wiki/File:Mergevsrebase.png
Doing a Git Rebase #
Now on to the actual doing. While there are some tools that will do it with a great GUI, I will show you how to do it with the command-line. That will show what is actually going on under the hood. To make things a bit more visual I will use a GUI tool. I actually really like the GitHub Desktop client, simple yet effective.
RadioButton PR #
I have a PR that I am still working on to add a RadioButton to the Xamarin.Forms toolkit. I want to ultimately merge it into main. It has been sitting there for a while now while main has had several changes added. In the screenshot from GitHub Desktop below you can see the current state.
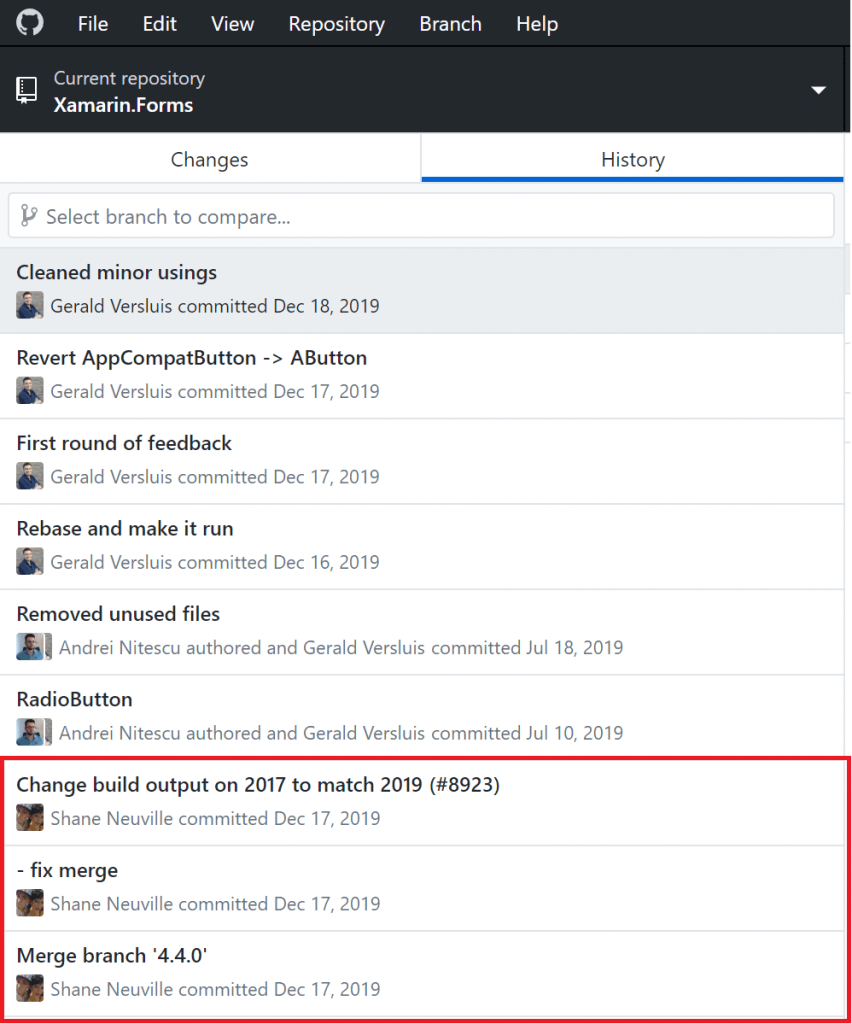
The commits marked in red at the bottom of the list are the latest changes on main at that time. Everything above that are the commits that hold the changes we want merged into main. You will see that Andrei made a great start with this PR and now I am taking over. If we take a quick look at the current state of the main branch, we will see the history as shown in the screenshot underneath.
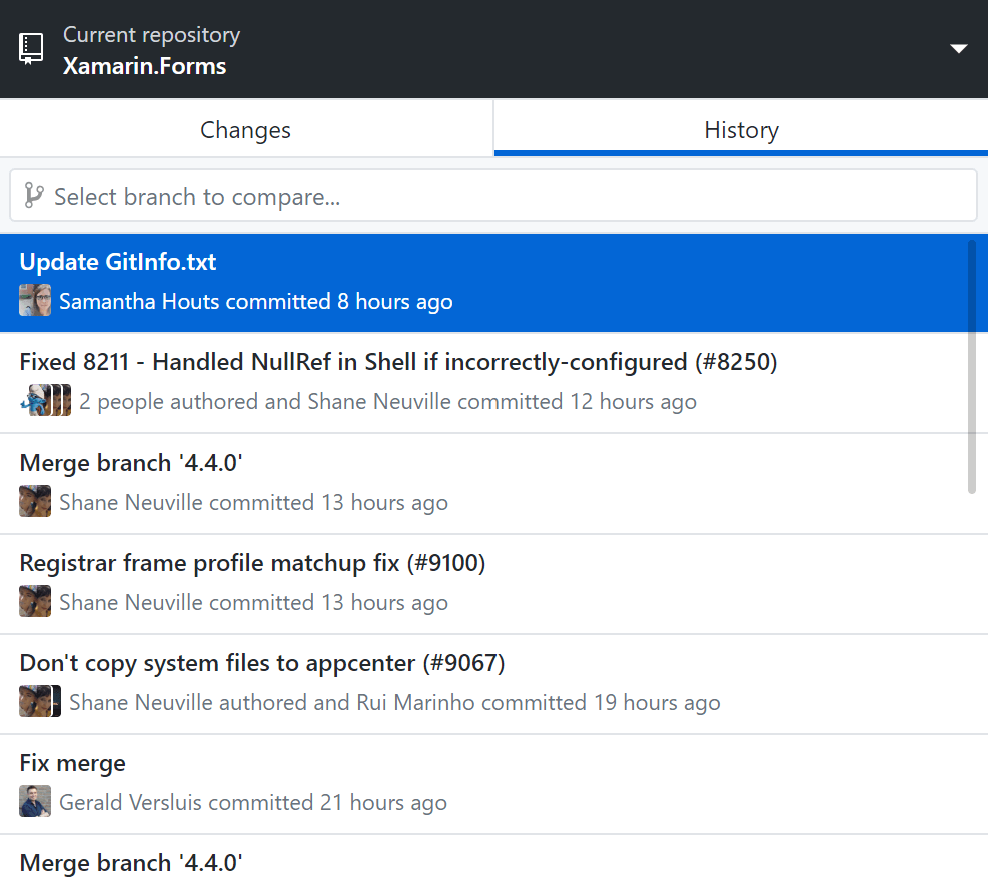
I’m just showing you this so you will have a reference point and you know what to look for during the rebasing process. Note the top commit here, we expect that to show up directly under our own commits in the new history.
Git Rebase onto Main #
The first thing we will do is open a command-line window. I will be showing you this on Windows, but everything works just the same on Mac or Linux if you will. Open the command-line and point it to the folder of your local Git repository. Then you type:
git rebase -i origin/main
The git rebase part is probably clear, that is the actual command. Then, we have the -i option. Which means you want to do an interactive rebase. The only thing this does is show you which commits are going to be rebased. You even have the option to remove commits, squash them, etc. although that is not something we will be doing now. Lastly, you see the origin/main part. That is the target branch. What we are doing here is basically saying: give me the latest situation on origin/main and replay the commits interactively from the branch I’m currently on. Does that make sense?
When confirming this command, you will see output like in the screenshot below.
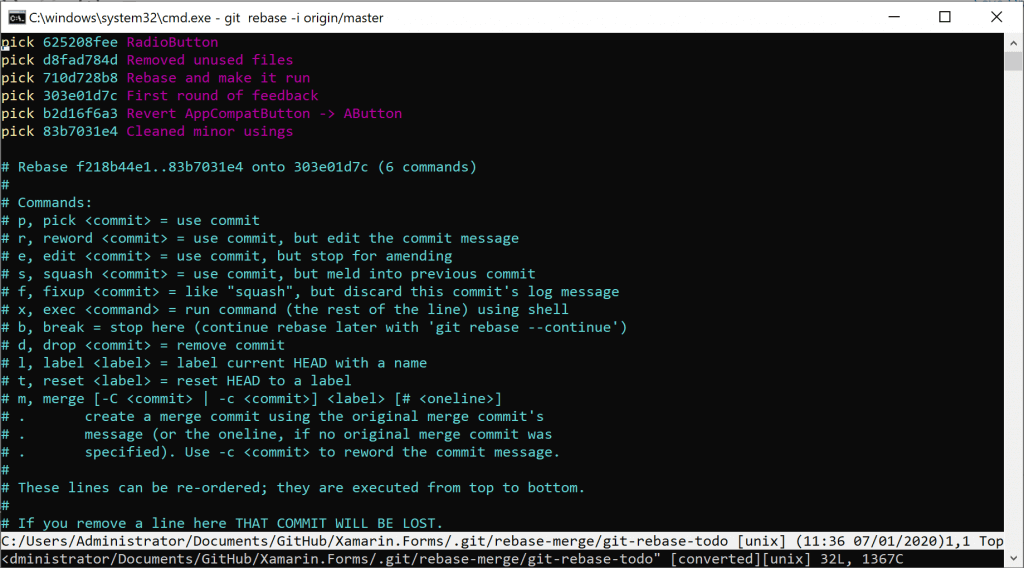
You will notice that these are the same commits as we saw in the earlier screenshot. The commits in this list which are prefixed with pick will be the commits that are replayed on top of the target branch. You can see all other commands below.
If, for some reason, there are commits in this list that you would like to exclude, just delete the lines by tapping d on your keyboard. You could also put a # in front of the line to comment it out. Or you could put the letter d or word drop in front of the line to exclude it from the rebase.
Escaping Vim #
Don’t be alarmed, I will tell you how to get out of here. But the interactive part has just opened Vim for you. After you have made all the changes, simply tap esc followed by typing :qw!. This will exit Vim (q), save the changes (w) and not ask for confirmation (!).
After you did, in the best case, your rebase is done! Hooray, congrats, high fives for everyone!
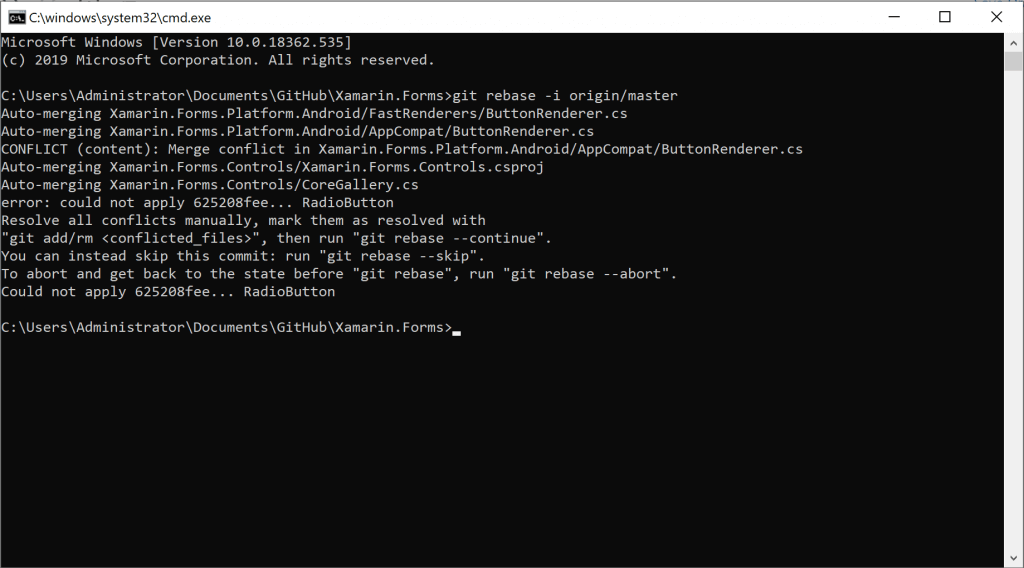
Dealing with Conflicts #
In a less ideal case, like mine, you will encounter a conflict. The changes that came in from your target branch edits were made in the same places as you made changes. The output from our rebase shows us what happened. You can see it in the screenshot underneath.
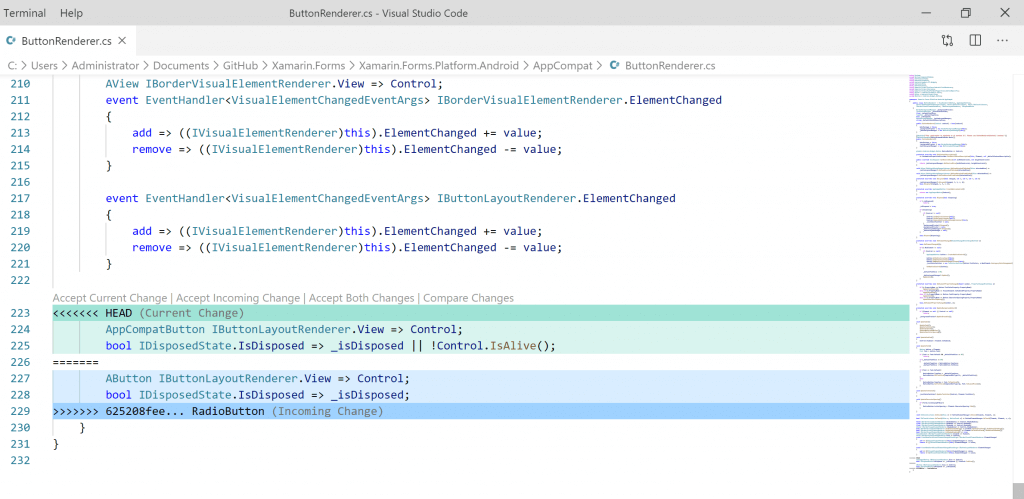
No worries, we got this! You can either fall back to your GUI tool and solve it there, or simply open the conflicted files with your favorite editor. Actual Visual Studio Code is very good with these conflicts.
In my case, I have a conflict in the ButtonRenderer.cs file, I will open it up in Visual Studio Code. With VS Code you can easily identify the conflict and it also provides you with some quick actions to resolve it easily, although you are free to blend the changes together and solve it that way. You can see my conflict opened in VS Code underneath.
Continuing the Git Rebase #
After you have resolved the conflict you mark the conflict as resolved by running git add {path to file} or if you want to remove the file altogether, replace “add” with “rm” for remove.
Now note that this happened after a certain commit. So, not all commits in the list we’ve seen before, but this conflict happened after one certain commit out of that list. That means, that after we resolved the conflict, we continue the rebase by typing git rebase --continue. This will take the next commit from the list and apply that.
From that commit another conflict might emerge and you rinse and repeat until you are done. If you’ve lost faith, you can do git rebase --abort to undo the whole thing and go back to things as before we started this.
Rewriting History #
Now our Git rebase is done. What I like to do is to inspect if everything went the way I expected. To do this, I look at the new commit history. You can see the history in my GUI tool in the screenshot below.

Notice how the commits at the bottom, in red, are the ones that were the most recent on the current main branch. Everything above the red box, are the commits that I wanted to rebase. Effectively, we have rewritten history!
However, this means there is one last scary part to overcome… The Git force push.
Git Force Push #
Because we did rewrite history our branch is in a weird state. Remotely things look differently than we have locally. Locally we suddenly have all kinds of new commits from main that are not on our remote PR branch. Because of the rebase, our local branch is the leading one. This has all the latest bits from our target branch and includes all of our changes.
To get it all back into sync, we need to do a force push. With a force push we simply push all our local changes and overwrite whatever is on the remote branch. It sounds scary and it is! Because we simply rewrite everything on the remote branch this is a destructive operation so you should handle with care. If there are commits on the remote branch that you do not have locally, they will be gone after a force push.
After this post was published, Steve Gordon tweeted with a thing he’d like to add to this. Since I think it was a good addition, I’ve added the tweet for you below.
Great post on Git rebasing! One thing I'd add is that this is fairly safe on a personal GitHub fork and/or where you're reasonably confident no one else has pulled the remote branch you plan to force push. In other cases, rewrite remote history with caution. https://t.co/eNLEuGPPFz
— Steve Gordon (@stevejgordon) January 8, 2020
On the other hand, it is not as scary if you’ve done it a couple of times. Especially when you get the hang of doing rebases, and do force pushes more often. You do need to pay attention though and make sure that you got all the changes and commits you want. That is why I like to keep my rebase operation interactive and then inspect the outcome in a GUI tool, looking at the history.
OK, enough with the warnings. When you are ready, simply run this command:
git push --force
That will push everything from local to remote and everything is back in sync. It’s done! Now you know how to rebase. You can do this immediately after the rebase, or first add some more changes to your branch and push them along with everything else.
Recap #
While a git rebase might sound scary at first, it’s not so bad when you have done it a couple of times. Hopefully with this post you have learned what a rebase is and mostly: what to expect. In any case, as long as you don’t (force) push, you can just fiddle around with it locally. Keep your eye on the history and/or graph to see what your actions are doing to the commits. And remember: there is no shame in asking for some help. Everyone has got to learn.
Reasons to Rebase #
There might be multiple reasons for needing a rebase. In this post we have seen a branch going out of date, but another reason might be that you need to target another branch. For instance, you don’t want to merge your changes into main anymore, but another branch, let’s say release. In that case you can simply run git rebase -i origin/release and all your commits are replayed on top of that.
The reason I mention this, is that there is then one other thing to take into consideration. If you already have an open PR for this change, you also want to change the target branch on that PR. Else you will see all the commits that aren’t in the target branch show up in your PR which is not what you want. It might sounds a bit abstract this way, but trust me, once you find yourself in this situation you will see what I mean ;)
Git Rebase Steps #
How to do a Git Rebase
Switch to the branch/PR with your changes
Locally set your Git repo to the branch that has the changes you want merged in the target branch
Execute the Git rebase command
Run
git rebase -i origin/mainif you want to do it interactively and your changes need to go in main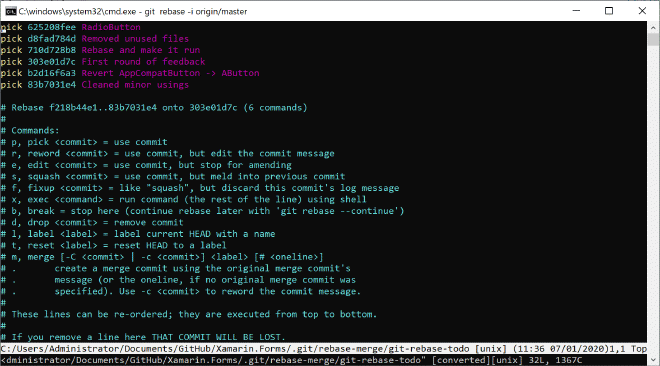
Fix all and any conflicts
The target branch might have newer changes that conflict with the changes you want to add. Resolve conflicts and continue the rebase with
git rebase --continue
Force push the new history
When all conflicts are resolved and you have ensured yourself that all code changes work nicely together, force push the new branch history with
git push --force


Another good resource to learn some more Git is https://learngitbranching.js.org/. There you can safely try all kinds of things and visually see what the result is.
Thank you for reading! As always, any questions, remarks or anything, don’t hesitate to reach out.