Implement grouping in the Xamarin.Forms ListView

Recently I have answered a question on StackOverflow, like I do a lot, and I thought I’d turn it into a blog post! Maybe I should make a series out of it.. In the meantime, the subject is: implementing grouping in a ListView.
The sample code for this post can be found here: https://github.com/jfversluis/GroupingListViewSample
Question #
The question was: how to implement grouping into a Xamarin.Forms ListView. It can be reviewed here.
While this seems a pretty straight-forward feature, actually doing it might be some work.
Answer #
The answer consists of a few steps. If we adopt the case that is asked in the question, we will show a list with different phone models, which should be grouped by its manufacturer. As you can imagine, we need a list that holds a key and a value which is another list. Together, this will be our group. In this example, the key will be a simple string, but this could also be a complex object if you would want to. As we will see later, you can just use data-binding to pick the data that you want.
Grouping Model #
In the above code you see the model that I have implemented to act as a group. I have inherited the ObservableCollection which hold the Phone model. The Phone model is a arbitrary object with a few simple type properties. In this inheritance, I have introduced a Name property. So, basically, we now have a ObservableCollection with a key to group our list by.
Page #
For brevity, I have used the code-behind of my page as the view model, but all this works from an actual separate view model just as well.
Notice how I created a property which is another ObservableCollection which holds our group model. So, now we have a collection of objects that are grouped together. In the constructor, I add some models to is manually. In real-life, you would probably get your data online and group it into the collection with a LINQ query or similar. Finally, I set the BindingContext to the code-behind class so the XAML will pick up our collection.
In the XAML, I define the ListView, as shown in the code below.
The two properties to note here are the IsGroupingEnabled and GroupDisplayBinding. The IsGroupingEnabled can simply be set to true to enable the grouping behaviour. Then with the GroupDisplayBinding, you can bind to a property of the group model that is shown as the group header. In our case, this will be the company name, i.e. Apple, Huawei and Samsung. This is all we need to enable grouping!
In the below screenshot, you can see the result of this sample code running in the iOS SImulator.
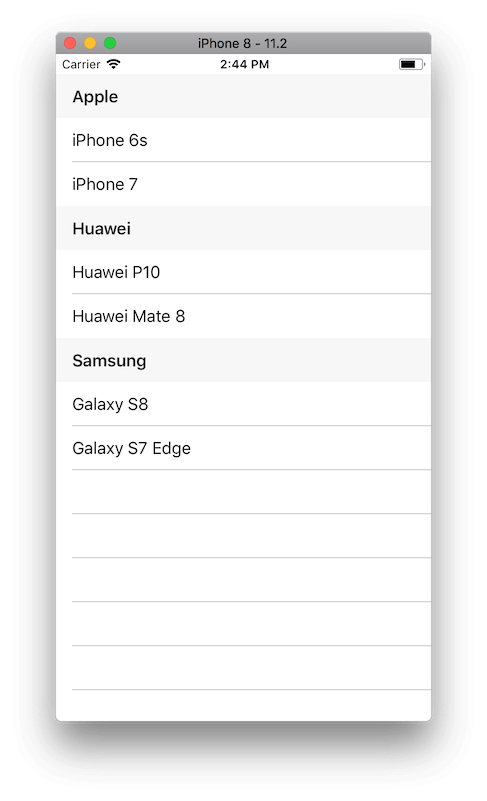
For iOS there is an extra feature to enable, which is the jumplist of letters on the right. This is implemented by binding to the GroupShortNameBinding property. Typically, only first letters are visible here. SImply bind to the first letter of each group or introduce a separate property for this and you are ready to go.
In Closing #
In this post I have shown you how to implement your own grouping model and use that to enable grouping in the ListView. To not reinvent the wheel and use a more generic way, I would recommend looking at the MVVM Helpers library by James Montemagno. You can find this library here: https://github.com/jamesmontemagno/mvvm-helpers. For starters, it holds the ObservableRangeCollection, which makes it easier to add or replace a range of values in the ObservableCollection. But in addition, there is a Grouping model which is a more generic way of implementing this.
Please check out all the sample code here and don’t forget to follow me on Twitter or YouTube for more Xamarin content!