Custom Fonts with Xamarin.Forms Revisited

In a post from way back, I have written how to implement custom fonts on iOS and Android. Recently, a Twitter follower asked me for some sample code for this, since I couldn’t get it to work. I quickly started working on it, but soon found out that the code in the post was a bit outdated. Since it is still a question that is very relevant and asked a bunch of times, I decided to do an updated post with the sample code I have created here.
For this post, I will add the infamous Comic Sans font to our wonderful sample application.
Custom Fonts on iOS #
For iOS, things are pretty much the same. To implement a custom font, make sure you add the font to the Resources folder or a subfolder under that. To let your app find the new font, you need to add it to the info.plist file. Beware! All fonts you add to the info.plist file are loaded when the app is loaded. Don’t use too much custom fonts, or it will slow down your app startup and increase memory usage.
I will add the font file ComicSaaaans.ttf to the Fonts subfolder in my iOS project. Make sure the Build Action is set to BundleResource. Then edit the info.plist file like underneath.
Custom Fonts on Labels #
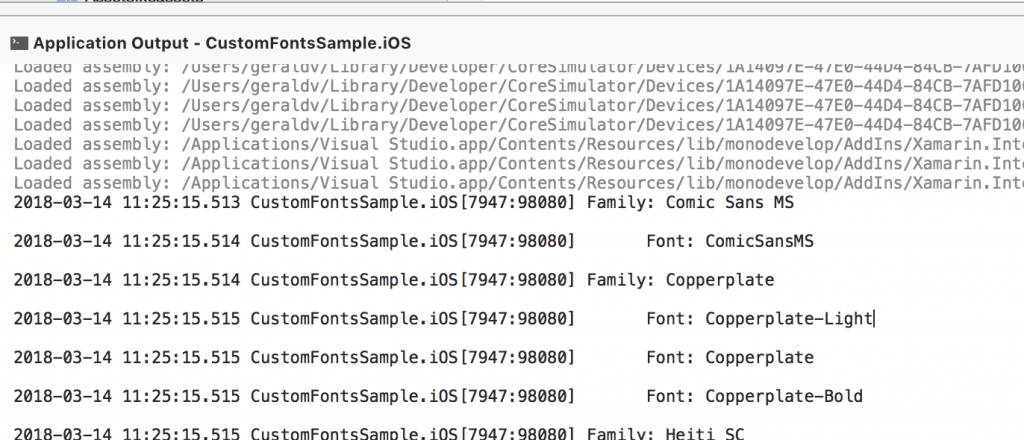
To apply the new font to labels (or any other control that supports the FontFamily property), simply specify the name of the font family. Please note, the name of the font family is not the same as the filename. If you don’t know the name, you can find out a few different ways. One of them, is by incorporating a little code snippet that you can see underneath.
With this code in the AppDelegate.cs, you will see a list of all the fonts that are included in your app. Find the right one that is listed behind the ‘Font:’ tag. In the case of this sample font, it is ComicSansMS. You can see a sample of the application output in the screenshot below.
You should also be able to deduct the font family name from the font subsystem in your operating system. Open the font file in either Windows or Mac OS, and you should be able to find it.
To apply the font to a control that supports it, simply specify the value that you just got from the application output in the FontFamily property of that control. You can see how I do it for a Label in the code below.
NavigationPage title Custom Fonts #
Another place that you might want to incorporate a custom font is the title of a page. To style this on iOS, you can simply set it through the Appearance API. In your AppDelegate.cs add this piece of code:
Note that this will apply it for all titles, which is typically what you would want I guess. If you want if for just one page, you will have to start looking into a custom renderer.
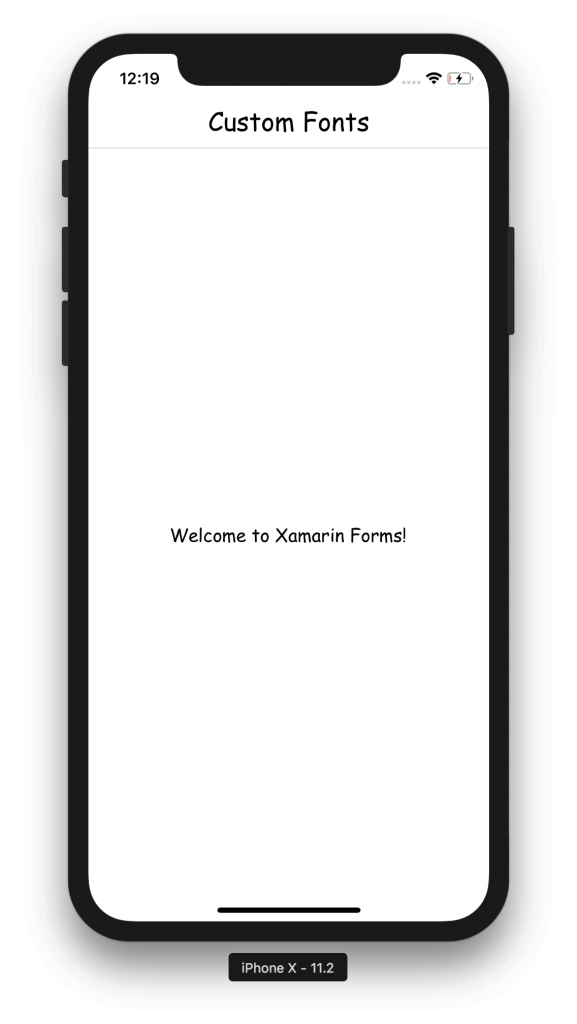
The result when running this on iOS, is in the screenshot below.
TabbedPage Tab Custom Fonts #
In the comments someone asked how to style the labels on tabs. I have included the code for that as well. On iOS, this requires the usage of a custom renderer. You can see the code underneath.
You can also easily extend this renderer to give the selected tab a different style, like maybe make the font bold.
Custom Fonts on Android #
For Android some things have changes for the better. Then again, there is also a little bit of confusion. Since Android 8 you can define fonts through XML. If you want to style the NavigationPage title, this is what we want. To make this work, make sure that your project targets at least Android 8 (API level 26). Then add a folder called font under the Resources folder and add our ttf file to the newly created font folder. A resource id will be created that is named like the filename of your font, but all lowercase. In our case: comicsaaaans. Make sure the Build action is set to AndroidResource. If you’re not looking to style the page title, you can skip this part.
However, because of the way Xamarin.Forms treats custom fonts right now, the font file needs to be in the Assets folder. To style the fonts of a control, add the font file in the Assets, and make sure the Build Action is set to AndroidAsset.
If you want to style both the controls and the page title, you will need to add the file in both places for now.
Custom Fonts on Labels #
To apply the font to controls you need to specify the font file name as well as the font family name. So, this is different from how iOS does it. For Android, Xamarin.Forms wants you to supply the font in this format: fontfilename.ttf#FontFamilyName. So, for our Comic Sans font: ComicSaaaans.ttf#ComicSansMS.
Because of that, we will need to make a differentiation for the different platforms. So, the code we have used above for iOS, will now start looking like underneath.
NavigationPage title Custom Fonts #
The title of a page is a different story on Android. This took me a little while.
Of course, you can choose to implement your own design for a Toolbar altogether. But I like to stick with what Xamarin.Forms provides me. To do this, you first need to add the font file as described above. Then, go into your styles.xml file under your Resources/values folder. Add a style like the one underneath.
The last thing you need to do, is apply the style in the Toolbar.axml file that comes with the Xamarin.Forms template. You can see the updated file in the gist below.
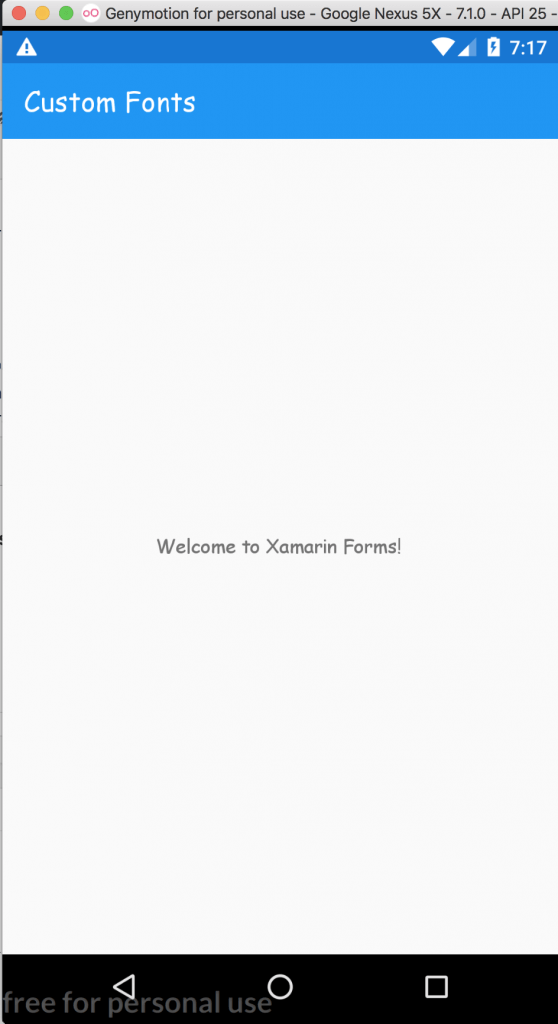
Note how I added the app:titleTextAppearance="@style/Toolbar.TitleText" attribute and according namespace declaration. When now running the app, you should have a styled label and page title!
TabbedPage #
Also for Android I managed to find out how to style the tabs. This is basically the same as styling the navigation bar title. Go into your style.xml and create a new one, specifying the font. Only the parent will be different this time. Now to into the Tabbar.axml file to apply this style, create a new app:tabTextAppearance attribute and set it to the style we just created. You can see the contents of both files in the gist underneath.
Summary #
You also should be able to implement this on UWP as well. Since this project is created on a Mac, I do not have access to a UWP project. For the basics check out the Xamarin docs.
In this post you have learned how to set custom fonts for both controls as wel as the NavigationPage title within Xamarin.Forms. You can have a look at the running sample code here: https://github.com/jfversluis/CustomFontsSample. If there are any questions, please don’t hesitate to reach out to me. Or, if you’re able to provide me with a working implementation of UWP. I’d be happy to take a PR in the sample repo.