Embedding native controls in your Xamarin.Forms app

As of version 2.3.3 and above of Xamarin.Forms it is now possible to embed native controls in your Forms app. I’ll let that sink in for a minute. Native controls, defined in XAML, from your PCL, without the need for any renderers whatsoever. Isn’t that just awesome?!
Whoa! Native controls? In XAML? #
Awesome right?! But to be perfectly clear, this isn’t like I wrote about in my post about accessing native controls with a renderer, you can create a Forms page and embed native controls which will show only on the targeted platform. At this time there are still some things that will probably worked out in the near future. The most important one (at least I think so) is that two-way binding is not supported at the time of writing. Also the ‘x:Name’ property cannot be used, or any other property that you can use on Forms controls. You also can’t use it with XAML compilation. At least the two-way binding I know of, is being worked on. The other caveats are up to you to decide if you can live with that while gaining this awesome feature.
Now that we have all of our facts straight, let’s just jump right in and see how that works.
The code #
I have just created a File > New Project Xamarin.Forms application. Working with a PCL and XAML. Nothing out of the ordinary. To start with make sure you update the Xamarin.Forms NuGet package on all of your project to some version 2.3.3+, else all of this goodness won’t work.
Since I’m still an iOS guy let’s start with that. I’ve spiced the default Forms app template page with an extra namespace declaration and already some iOS controls.
Note how the namespace I’ve added references UIKit directly out of the Xamarin.iOS assembly. There is one odd thing about this declaration though; it has ’targetPlatform’ attribute. With that attribute you specify for what platform this namespace has to be included. It can either be iOS, Android or Windows. So, make sure you appoint the right platform for the right assembly else you’ll be in trouble. A little more on this later.
The next thing to notice is how we can mix the native controls up with the Forms controls. This is pretty convenient because you can’t use the Forms layout properties on the native controls, so you probably want to wrap them in Forms controls to do some layouting. When we run this, this is what we will see:
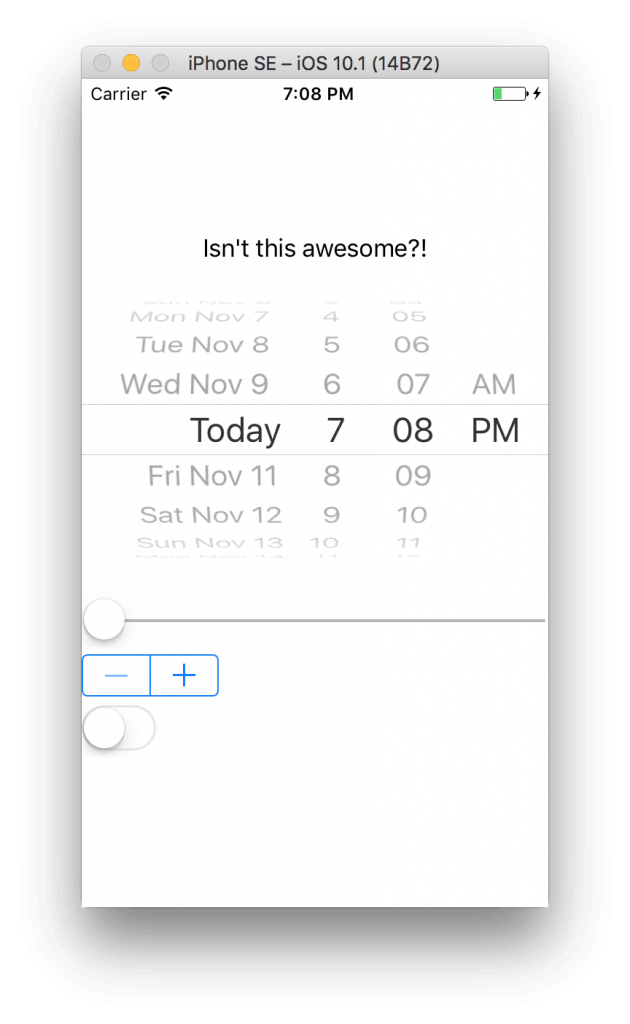
Pretty cool, right? There are some things that we can achieve with Forms controls, but there is also some stuff - like the UIStepper - that could not be done so easily before.
Let’s go a bit further with Native #
Now let’s make things a bit more interesting.
I’ve added a MaxValue to the UISlider, which is a native property and have assigned it with 10. For the value I have created a data-binding to a property of integer called SlideValue. I’ve set that value to 5.
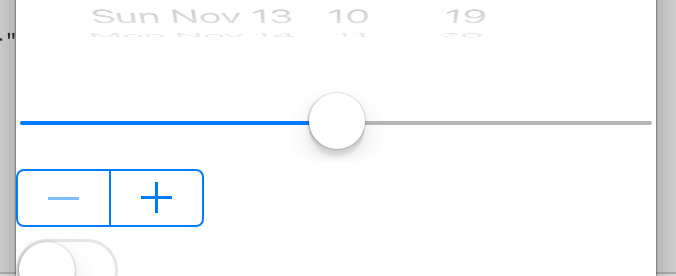
When we run this, we see that this is all done nicely, so accessing native properties and binding works on these bad boys as well! As I have mentioned before: two-way data-binding doesn’t work (yet). Because you can’t use the ‘x:Name’ property and you can’t use two-way binding there are some controls that aren’t useable right now because there is no way to get a value in or out or respond to changes by wiring up an event. As a workaround you can always build your page in code. That way you do have a reference to the control and can setup the events.
Customizing native controls #
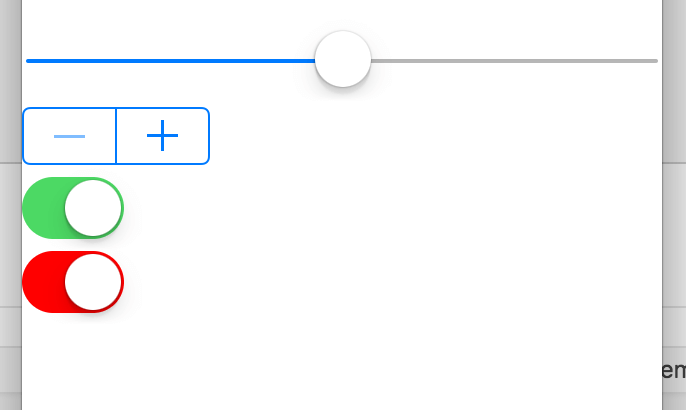
Having access to the native properties is great! But it does create another problem. If we would want to set the color of the UISwitch, we can now easily do that by setting the OnTintColor. But since it is a native control, it now expects a UIColor! While we could probably figure out a way to get a UIColor in there you shouldn’t want to have a reference to platform specific stuff in your PCL. Ok, we already have some kind of reference to it because we are now using the native namespaces, but the less the better. So then we should add an effect or write a custom renderer, right? Wrong! We are using native controls already, there is no renderer to convert them from Forms controls to native. Luckily the solution is simple; just create your own custom control.
In your iOS project just create a new class which inherits from the UISwitch, in my case the UIRedTintSwitch.
In here just add all the customisations you want. Then go back to your Forms page, add another namespace to it and use the control like every other control.
Build and run the new code and toggle the switch.. Did I already say this stuff is awesome?
How about Android? #
You will probably believe me when I say this will all work on Android as well since I’m a reliable guy. But there is one more thing I want to show you.
I’ve added another two namespaces and one extra control, but this time for Android.. In the same page! Because of the targetPlatform tag you can also mix Android, iOS and Windows controls all in one page! When you run it, you will only see the controls that are supposed to on that platform. And of course the Forms controls. So when we run this…
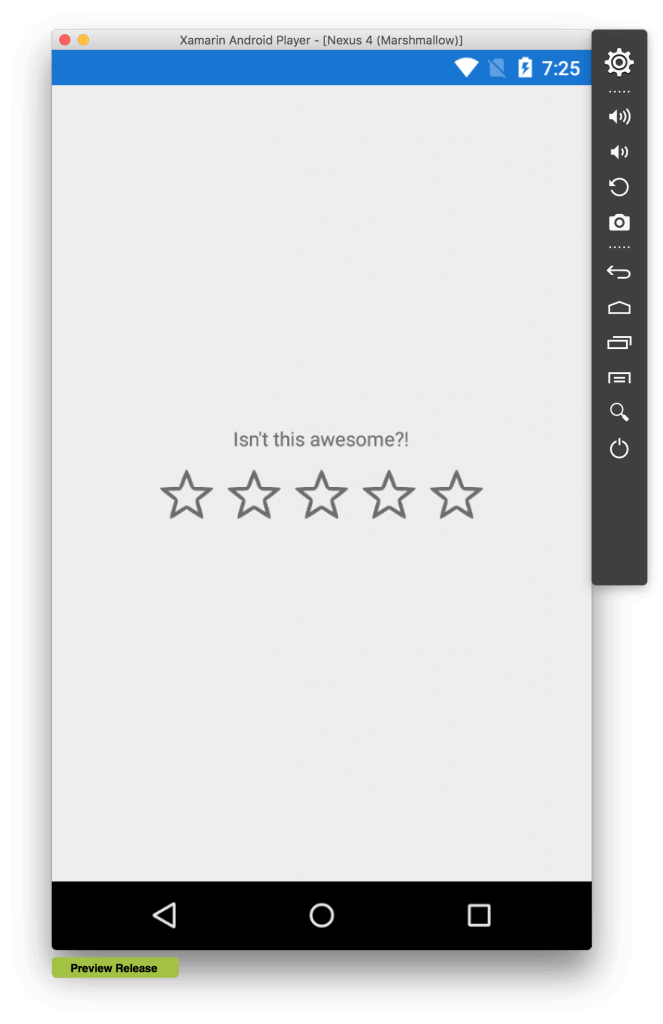
We see no iOS controls whatsoever, but we do see the RatingBar for Android! If this is something you would actually want in real-life scenarios is for you to decide. Your pages can be pretty complicated as it is, if you should also take into account that native controls have to be rendered at the right place that can be problematic. But for simple scenario’s it is good to know you can do it.
Something that seems odd in the Android control is the ‘x:Argument’ attribute. This is because Android controls need to have a Context and this the way to provide them with one. You will notice that I have added two namespace because of this, one to be able to retrieve the Context. Now for every Android control you need to add this attribute, else you will receive a MissingMethodException at runtime.
Wrapping up #
I hope you will trust me when I say all of this will work for Windows as well. If you want to read some more on this, check out this link for some stuff by Xamarin themselves. The code for this app is up on my GitHub page.
Please note that this functionality is in pre-release right now so thing might have changed a bit and probably have gotten even better in the meantime.