Create a Google Chromecast app with Xamarin.Forms in under 10 minutes

While I was waiting in between builds, I decided to put on some radio in the background. I started looking for a good app on my desktop I found TuneIn, which is nice. But I couldn’t Chromecast it to my Google Nest Mini device. I got the impression that TuneIn isn’t much more than a aggregator of livestreams of radio stations around the world. I decided to take a few minutes, find the radio station live stream and roll my own macOS app. That app just takes the live stream and puts that on my Google Nest speaker. In this post, you’ll learn how.
Just 10 minutes?! Come on, that’s impossible! #
I am not exaggerating, it was literally 10 minutes! Does it look pretty? Definitely not. Does it work? Absolutely!
In this post we will see how we can setup a very simple Xamarin.Forms application and add a NuGet library that will let us communicate with Google Chromecast devices. If you just can’t wait, the code can be found here: https://github.com/jfversluis/CastRadio
And in 10 minutes, what will we achieve? #
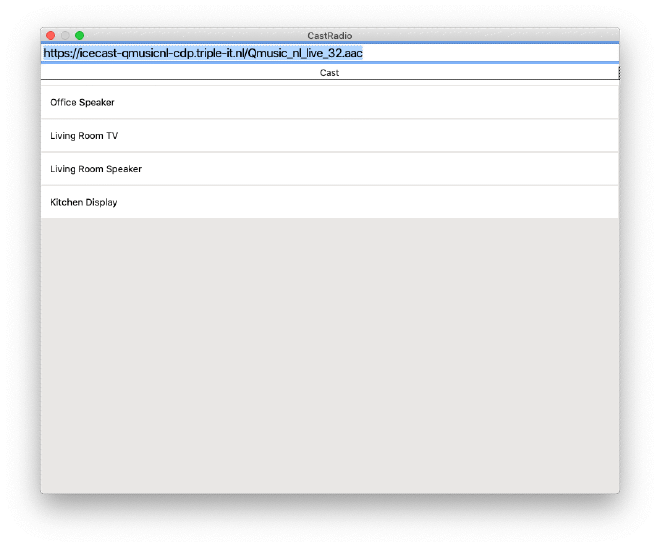
Let me present you with a screenshot, which you can see below.

CastRadio Chromecast application running on macOS
The interface is very simple, a StackLayout with inside an Entry, Button and ListView. The Entry is used to supply a URL to stream, the Button is to start casting and the ListView is to show the devices that are found on my network.
OK, but shouldn’t we be using CollectionView now? #
You certainly do! But it’s not supported for macOS yet :(
I guess functionality counts, is at least the code beautiful? #
Well… It depends! 😬 I have applied some MVVM principals, but since it was just a quick and dirty app there still needs to be a lot of error handling and other things. But actually, the code can mostly be captured in a few lines, you can see them below.
First things first, to implement the Cast protocol, I have used a package by kokone called GoogleCast.
From top to bottom. In the constructor you see I call the Init method. There I query my local network for devices and each one that I find I add to my ObservableCollection so it will be shown in my ListView.
On that same ListView, I have a data binding to the SelectedItem. This will make sure that whenever I select a device the backing property is filled. This is done by creating a two-way binding. For reference, have a look at the XAML below, which is the page that belongs to the code above. The data binding I am talking about happens on line 6.
I also have a Button in there. Whenever the button is clicked, it will take the selected device, connect to it, get a channel and feed it with the URL that you have entered above. In my case I’ve added my favorite local radio station stream.
And that’s it! Now I hear my speaker bleeping and it starts to play the stream. Mission accomplished!
Anything else? #
Not really! While using this daily I have noticed there are some things that might be nice to have, so maybe when I got another 10 minutes I’ll play with it some more to see if I can implement things like volume control and make things a bit more robust and tidy.
Mostly I just wanted to show how powerful all of this stuff is and how easy to use. And because I have set this up in Xamarin.Forms I can also run this automatically on my iOS and Android devices or UWP, GTK and more if I would add them to this project.
Image by John Tekeridis via Pexels