Localization of the default iOS controls
When you are not from a English speaking country like myself, you will probably find yourself creating apps in your native language from time to time. Localization is something that you probably want to look into.
While doing just that in Xamarin.Forms I noticed that, when using controls like the SearchBar (which is further explained in a previous post), the Cancel button keeps saying Cancel, no matter what I did. And while working on my DateTimePickerCell I also noticed the Done button, kept showing Done, and there are probably more places where I didn’t even discover them yet.
But, if you’re like me, you want to go for the best possible user-experience, which includes a consistent language throughout your app.
My gut feeling told me that this MUST be possible and so, I quickly went on to my favoooooorite search engine and soon found out that there was actually a bug filed with Xamarin. And better yet, it contained a solution as well!
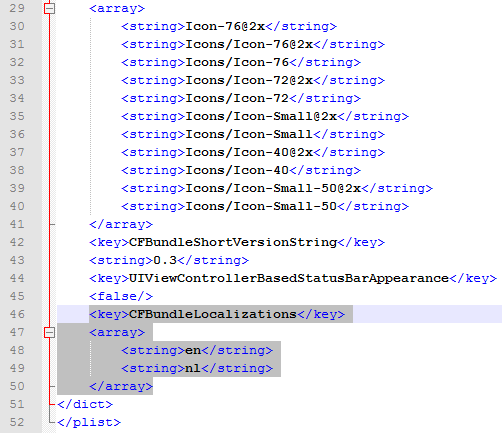
It has to do with the fact that you should tell your app which localisations it should include in your app package. The people at Xamarin do not have an awesome looking GUI for it yet, so you will have to open up your info.plist file manually (i.e. with Notepad++) and add this right before the tag.
<key>CFBundleLocalizations</key>
<array>
    <string>en</string>
    <string>nl</string>
</array>
As you could have guessed this includes the Dutch language, but you can add as many entries with all the languages codes you need.
Note; you can either use the language description string or use the ISO 639-1 language code, I would recommend the latter as it is more standardised and predictable.
I our info.plist it now looks something like this;
While finding and implementing this solution I found that there are a lot more keys you could incorporate in your info.plist file, but aren’t supported (yet) by the Xamarin GUI editor. For a list of all the keys and recommended keys have a look at the Apple developers reference.
Now, when you run your app — and don’t forget to set your device and/or simulator language — you will see that all of the ‘untranslatables’ are now shown in the language of your choosing! Awesome! Localization done.