Push notifications with Xamarin - Android

After my introduction, configuring Azure and implementing the iOS code it is now time for the Android side of things.
Updating the Azures #
First things first. We need to do some more configuration in Azure. Don’t worry, it’s not nearly as much as last time. If you’re only creating a Android app and missed the initial Azure Notification Hub configuration check my previous post and leave out all the Apple specific stuff.
Now go over to your Google Developer Console, log in and in the top bar find a menu that will have a name of a project you already have of some default value (don’t know what it says when you don’t have any projects yet sorry.). Open the menu and click the New Project… option.

Give it a meaningful name (like ‘XamarinNotifications’) and click Create. After waiting a bit your new project will show up! You should end up at the dashboard screen which has a noticeable blue box that says ‘Use Google APIs’ on it. Click that and in the next screen find the ‘Google Cloud Messaging’ option. You can either search for it or find it somewhere in the list near the Android icon.
At the top-side there should be a Enable button which you should click. You will now get a warning that while the API is enabled, you still need to enter some data in the Credentials tab. So click credentials on the left-side, open up the Create credentials button and choose API key.
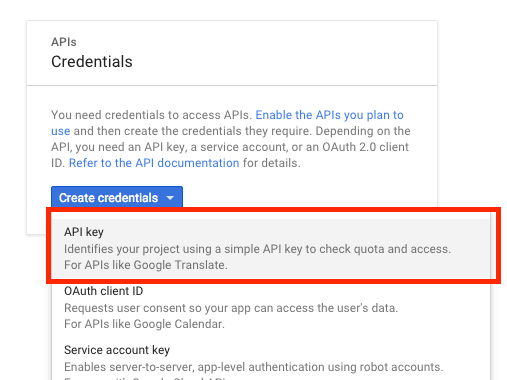
In the pop-up that shows up you can choose which type of key you would want. Choose the Android key here. Again, at the name come up with something useful (like ‘XamarinNotifications key’). While it is optional you should add the package fingerprint to your API key. This prevents any malicious use. To enter it here you should have already registered your app name in your Play Store account and create a keystore for your app. This is beyond the scope of this article right now. But if you’re having trouble just let me know.
Now click the Create button and you should be presented with your Google Cloud Messaging API key!
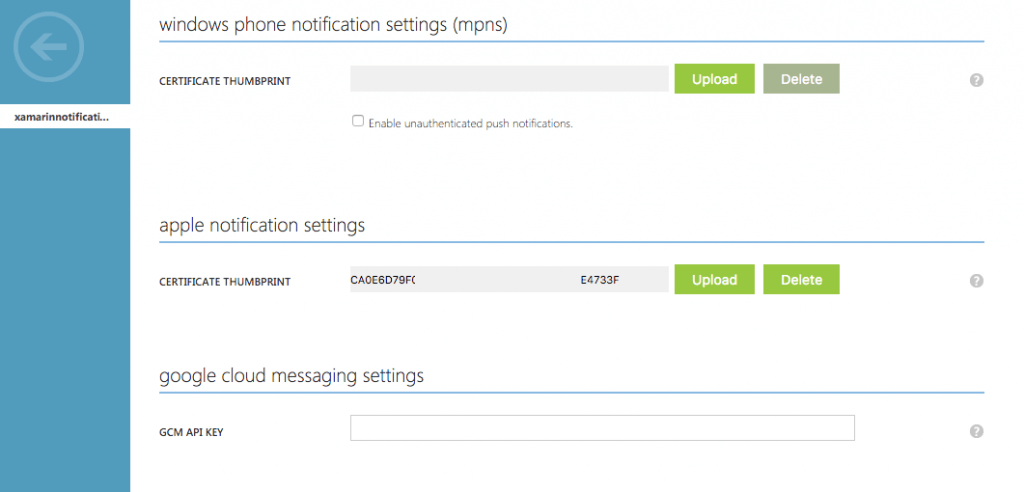
With this API key we go, once again, to our Azure portal. Find your Notification Hub and go back into the Configure tab. This time find the ‘google cloud messaging settings’ header paste your API key in there and hit the Save button that appears at the bottom to confirm.
Boom! That’s it for Azure! Much better than last time, right?
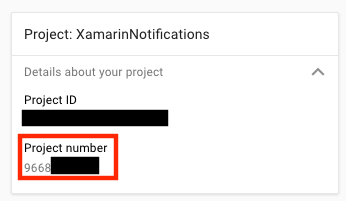
One more thing.. Before you leave the Developer Console go to the dashboard of your project and find your project number, you’ll need it later. Not the project ID, the number.
Android implementation #
Now that we have Azure communicating with the Google servers it’s time to update our app.
This time we will focus on the .Droid project of our Xamarin.Forms solution. One again, all the (updated) code can be found in my GitHub repository.
While push notifications on Android follow roughly the same pattern as on other platforms there are some subtle differences. On iOS there are a few different events that are invoked to register and receive push notifications. On Android you should use a BroadcastReceiver, which in its turn uses a Service. The basic events are the same you have to register your device, act on when a notification is received, etc. It is just named and handled a little different. I’ll show you the code to use a little later on, we need to do some preparation first.
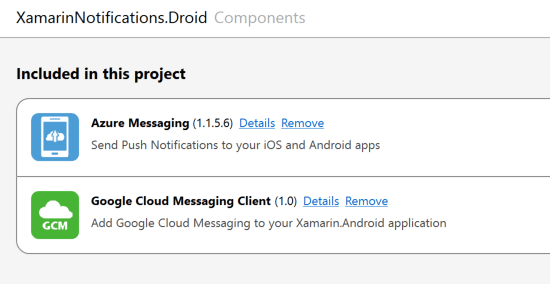
Like I’ve said in my previous post; all roads lead to Rome. There are multiple ways to go about this. To stay consistent I will install the Xamarin component for Azure Messaging also to the Droid project.Right-click the ‘Components’ node in your Droid project and choose ‘Get more components…’. Find the ‘Azure Messaging’ component and add it to your app. While you’re in the Components screen also add the ‘Google Cloud Messaging Client’.
So now that we are all installed, let’s setup the classes in our Droid project to achieve this. Normally you would create one class per file, but because the BroadcastReceiver is so small, I usually choose to put it in the same file as the Service for overview. Because code speaks more than a thousand words, I will just put the code below.
Create a new file in your Droid project ‘PushHandlerService.cs’ and put this in it.
using Android.App; using Android.Content; using Gcm.Client; using Java.Lang; using System; using WindowsAzure.Messaging; using XamarinNotifications.Helpers;
// These attributes are to register the right permissions for our app concerning push messages
\[assembly: Permission(Name = "com.versluisit.xamarinnotifications.permission.C2D\_MESSAGE")\]\[assembly: UsesPermission(Name = "com.versluisit.xamarinnotifications.permission.C2D\_MESSAGE")\]\[assembly: UsesPermission(Name = "com.google.android.c2dm.permission.RECEIVE")\]//GET_ACCOUNTS is only needed for android versions 4.0.3 and below
\[assembly: UsesPermission(Name = "android.permission.GET\_ACCOUNTS")\]\[assembly: UsesPermission(Name = "android.permission.INTERNET")\]\[assembly: UsesPermission(Name = "android.permission.WAKE\_LOCK")\]namespace XamarinNotifications.Droid.PlatformSpecifics { // These attributes belong to the BroadcastReceiver, they register for the right intents
\[BroadcastReceiver(Permission = Constants.PERMISSION\_GCM\_INTENTS)\]\[IntentFilter(new\[\]{ Constants.INTENT_FROM_GCM_MESSAGE }, Categories = new[] { “com.versluisit.xamarinnotifications” })]
\[IntentFilter(new\[\]{ Constants.INTENT_FROM_GCM_REGISTRATION_CALLBACK }, Categories = new[] { “com.versluisit.xamarinnotifications” })]
\[IntentFilter(new\[\]{ Constants.INTENT_FROM_GCM_LIBRARY_RETRY }, Categories = new[] { “com.versluisit.xamarinnotifications” })]
// This is the bradcast reciever
public class NotificationsBroadcastReceiver : GcmBroadcastReceiverBase<PushHandlerService>
{
    // TODO add your project number here
    public static string\[\] SenderIDs = { "96688------" };
}

\[Service\] // Don't forget this one! This tells Xamarin that this class is a Android Service
public class PushHandlerService : GcmServiceBase
{
    // TODO add your own access key
    private string \_connectionString = ConnectionString.CreateUsingSharedAccessKeyWithListenAccess(
        new Java.Net.URI("sb://xamarinnotifications-ns.servicebus.windows.net/"), "<your key here>");

    // TODO add your own hub name
    private string \_hubName = "xamarinnotifications";

    public static string RegistrationID { get; private set; }

    public PushHandlerService() : base(NotificationsBroadcastReceiver.SenderIDs)
    {
    }

    // This is the entry point for when a notification is received
    protected override void OnMessage(Context context, Intent intent)
    {
        var title = "XamarinNotifications";

        if (intent.Extras.ContainsKey("title"))
            title = intent.Extras.GetString("title");

        var messageText = intent.Extras.GetString("message");

        if (!string.IsNullOrEmpty(messageText))
            CreateNotification(title, messageText);
    }

    // The method we use to compose our notification
    private void CreateNotification(string title, string desc)
    {
        // First we make sure our app will start when the notification is pressed
        const int pendingIntentId = 0;
        const int notificationId = 0;

        var startupIntent = new Intent(this, typeof(MainActivity));
        var stackBuilder = TaskStackBuilder.Create(this);

        stackBuilder.AddParentStack(Class.FromType(typeof(MainActivity)));
        stackBuilder.AddNextIntent(startupIntent);

        var pendingIntent =
            stackBuilder.GetPendingIntent(pendingIntentId, PendingIntentFlags.OneShot);

        // Here we start building our actual notification, this has some more
        // interesting customization options!
        var builder = new Notification.Builder(this)
            .SetContentIntent(pendingIntent)
            .SetContentTitle(title)
            .SetContentText(desc)
            .SetSmallIcon(Resource.Drawable.icon);

        // Build the notification
        var notification = builder.Build();
        notification.Flags = NotificationFlags.AutoCancel;

        // Get the notification manager
        var notificationManager =
            GetSystemService(NotificationService) as NotificationManager;

        // Publish the notification to the notification manager
        notificationManager.Notify(notificationId, notification);
    }

    // Whenever an error occurs in regard to push registering, this fires
    protected override void OnError(Context context, string errorId)
    {
        Console.Out.WriteLine(errorId);
    }

    // This handles the successful registration of our device to Google
    // We need to register with Azure here ourselves
    protected override void OnRegistered(Context context, string registrationId)
    {
        var hub = new NotificationHub(\_hubName, \_connectionString, context);

        Settings.DeviceToken = registrationId;

        // TODO set some tags here if you want and supply them to the Register method
        var tags = new string\[\] { };

        hub.Register(registrationId, tags);
    }

    // This handles when our device unregisters at Google
    // We need to unregister with Azure
    protected override void OnUnRegistered(Context context, string registrationId)
    {
        var hub = new NotificationHub(\_hubName, \_connectionString, context);

        hub.UnregisterAll(registrationId);
    }
}
}
You should see some resemblance to the structure of iOS. When our device registers to Google, we also register at Azure and when we receive a notification we parse it and show it to the user.
Notification payload #
The payload of a notification is JSON, just like on iOS. A simple sample payload looks like this:
{“data”:{“message”:“Hi! I’m a notification!”}}
While the Google Messaging documentation states you could also use the ’notification’ key, which has some predefined keys to compose a notification out of the box, we will use the ‘data’ key variant. This is because with the notification key we also have to define the receiver. This is something we don’t (want to) know because we are going to send our notifications through Azure.
Also by using the data key you will have more control over the looks of your notification.
Implementing cont’d #
Now to finish it up, open the ‘MainActivity.cs’ and let our app register with the Google servers at startup. This triggers the methods in ourPushHandlerService class above.
protected override void OnCreate(Bundle bundle) { base.OnCreate(bundle);
global::Xamarin.Forms.Forms.Init(this, bundle);

// Check to ensure everything's setup right for push
GcmClient.CheckDevice(this);
GcmClient.CheckManifest(this);
GcmClient.Register(this, NotificationsBroadcastReceiver.SenderIDs);

LoadApplication(new App());
}
If you’d like you could also do this at a later stage in your app. Unlike iOS the user doesn’t have to permit the use of push messages on the spot. They agree to it by installing the app, so don’t panic when you’re not seeing any prompt.
Deployment #
While push notifications are always best tested on actual devices, we can test is on a simulator. I like to use Xamarin’s Android Player. The only thing you need to do is install the Google Play Store on it manually. You can find a guide on how to do this here. Just make sure you started the Play Store once, and logged in with your Google Account. After that we can start running our app!
When is has successfully deployed to the emulator go to the Azure portal and find the Debug tab of our notification hub. Select Android as a platform and make sure that the payload uses the same key as your code. Azure defaults to using the ‘message’ key like I’ve used above, if you have decided to use something else make sure you change it here - and later on in our server application - as well.
Hit the send button, cross your fingers, go back to your simulator and watch the result!
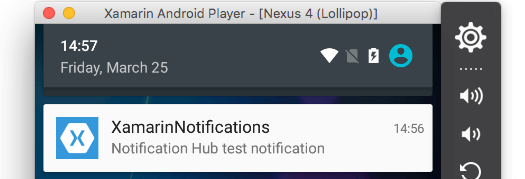
Isn’t it a beauty? Now you can play around a little yourself. If you’ve used the code that I provided above then you can also add a ’title’ tag to supply a custom title for instance.
Two down, one to go! iOS and Android are covered now, the only one left is Windows Phone which is actually a bit easier if you ask me. And of course the server application to provide all our apps with push notifications.
Once again you can find the sample code on GitHub and if you have any questions or suggestions don’t hesitate to contact me.
Also look into… #
Local notifications #
Like all of the other platforms Android has something called local notifications. These look just like push notifications but they are ‘sent’ locally. These notifications are just scheduled somewhere in your app and can even have a recurrence! Read all about it right here.
Customizing #
Actually different from other platforms is the fact that on Android you can actually customize your notification a little. You can show a custom icon with your own background color, show more text than just two lines with the expanded layout, and more! Read that here.
That’s it for Android, next up is Windows Phone!