Push notifications with Xamarin - Windows Phone

To conclude my ‘push notifications’ series I will now tell you how to implement push notifications on Windows Phone. Be sure to read my previous two posts on the notifications for iOS and setting up Azure and also implementing on Android. If you did read and/or follow them, this will be a piece of cake (hmm cake.). I find Windows Phone by far the easiest platform to implement notifications on. So lets get crackin’!
Prepare Azure #
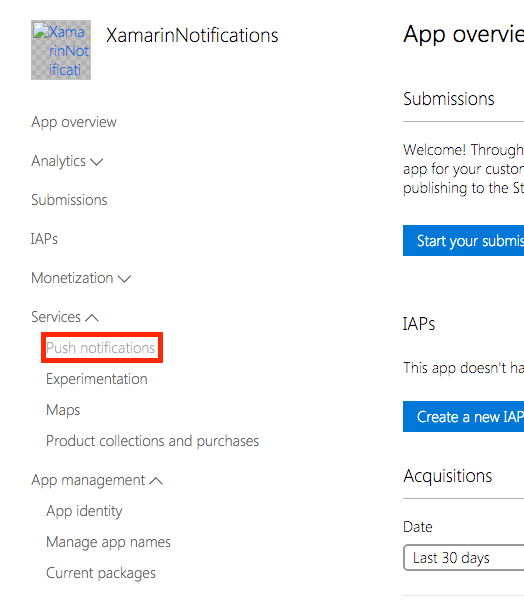
As you might expect, following my last few posts, I will first prepare Azure for sending notifications to our Windows Phone clients. So first step; go to the Azure management portal, to your Notification hub and find the Configure tab once more. Also, we need to go to the Windows developer portal. If you haven’t already done so; create a app entry for your app and go into the details.
In the left menu find ‘Services’ and then ‘Push notifications’ as shown below.
In the next screen watch closely to find a link to the ‘Live Services site’ and click it. This will most likely prompt you to login again. At the page you reach then you will see the needed information for our Azure back-end. Find the values under ‘Package SID’ and ‘Client secret’ and paste them in the corresponding fields in your Azure configuration. Don’t forget to hit the ‘Save’ button at the bottom!
If all is well the values are accepted and you are done configuring Azure!
Updating our app #
Other then iOS and Android on Windows you don’t get a unique token for your device, but you get a URL which acts as a notification channel. Luckily the rest of the workflow is the same as the other platforms so we can follow along the same path.
Because Windows Phone is just supported out-of-the-box by Visual Studio we can leverage a available NuGet package to implement the push notifications. The only issue they have created now is that there are two flavours of Windows Phone apps; Silverlight and Universal Windows apps. Because te later is going to be the future and is now the default template when you create a Xamarin.Forms solution I will only handle this one.
Go ahead and add the WindowsAzure.Messaging.Managed NuGet package to the WinPhone project. Then in the App.xaml.cs find the OnLaunched event. This event is fired, as you would expect, when the app is launched. Right after the opening tag you place this code;
protected async override void OnLaunched(LaunchActivatedEventArgs e) { var channel = await PushNotificationChannelManager.CreatePushNotificationChannelForApplicationAsync();
// TODO add connection string here
var hub = new NotificationHub("XamarinNotifications", "<connection string with listen access>");
var result = await hub.RegisterNativeAsync(channel.Uri);

// Displays the registration ID so you know it was successful
if (result.RegistrationId != null)
{
    Settings.DeviceToken = result.RegistrationId;
}

// The rest of the default code is here
}
Don’t forget to add the async keyword in the method signature.
When you take a close look at the code you will see that we try to create a channel over which we will receive the notifications. On the other platforms we only have a token which identifies the device, on Windows you also get a channel in the form of a URL with which we can reach the device. We only save the registration ID for now.
Again, I am using the Settings plugin to save this token for later use.
Also, you see that there is still a TODO in there, you have to insert a connection string. In the other project this is inferred from the access code you insert there. Here you need to provide the full connection string. You can find it by going to your Azure management portal, open the Service Bus screen and navigate to your Notification Hub. At the bottom you will find the ‘Connection Information’ button. When you click it you will see the DefaultListenSharedAccessSignature key. You need the value that is after this key.
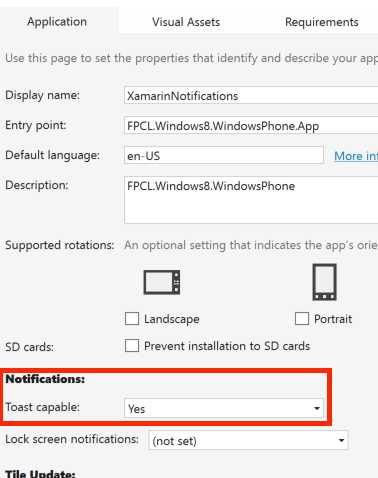
The last thing you need to do is declare that the app wants to use Toast capabilities. To do this go into your WinPhone project and find the ‘Package.appxmanifest’ file. Double-click it and set the Toast capable field to Yes. If you wondered; yes, toast is Microsofts way of saying push messages. Check out the different kind of messages you can send here.
Now run the app in the emulator and get back to your Azure management portal to test this out, right now!
In the Debug tab of your notification hub set the platform to Windows, and the notification type to.. Surprise, surprise; toast!
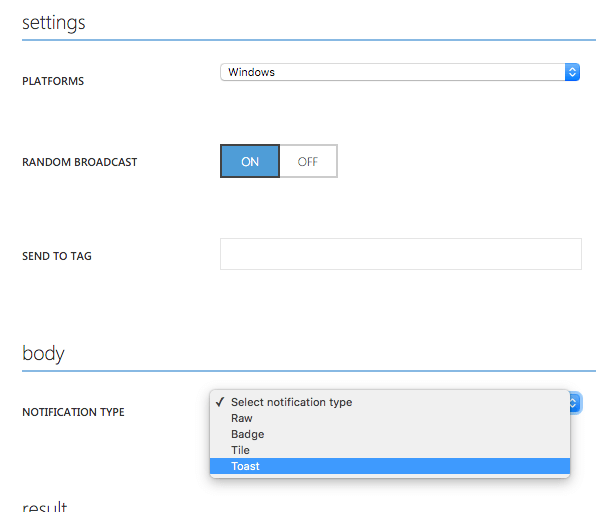
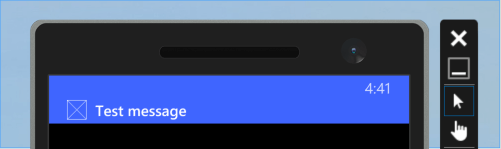
Now the only thing left is to push the Send button at the bottom of the screen and switch back over to your emulator and behold your new, epic, shiny push notification on Windows Phone!
As usual, find the sample code on my updated GitHub. For the last part, next time stay tuned to create a console tool which sends out push notifications to all of your apps at once!